pie chart

What Is Dead May Never Die! *PRIMER*

Commander / EDH BG (Golgari) Bracket 3 Construct Myr Sacrifice

NV_1980


Welcome to What Is Dead May Never Die!

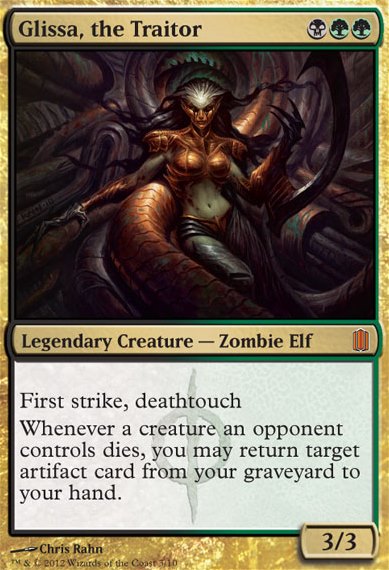
Hi there! Welcome to the primer of this Golgari, artifact-resurrection-combo deck; commanded by Glissa, the Traitor *oversized*. A long time ago, this she-Elf was known as a respected, expert hunter within the vast forest-scape of her home; the Tangle. Over the course of many years, she fought a drawn-out war against the sentient artifact-wizard Memnarch. Along the way she made friends, like the Goblin Slobad, the Leonin Kha Raksha and Bruenne the Neurok wizard. They helped Glissa overcome some of her struggles and even managed to save her life a number of times. In the end, her journey was partially successful, but only at great, personal cost. Though she managed to destroy Memnarch and its soul-powered machine, she had lost most of her family and friends. In fact, the surviving Elves blamed her for most of the wanton destruction that had been dealt to the Tangle during the struggle and started calling her 'the traitor'.

Incapable of retaining her mental strength because of what she had endured, Glissa got corrupted easily by Phyrexia's glistening oil when it managed to reach the depths of her world. The praetor Vorinclex saw potential in what she had transformed into and chose her as his accomplice; destined to create strength out of pitting the world's strongest creatures against one another in never-ending bouts of gladiatorial combat where only the strongest would survive. Those that didn’t were repurposed by her to remake magical artifacts, through rituals best left unexamined. Her abilities have now matured beyond measure. The artifacts she drains of power, are easily revitalized soon afterwards. So, be prepared to fight an unending horde of living (and seemingly undead) metal, as Glissa now focuses all her abilities to vanquish you! This deck is meant to be played casually. It’s not meant to be used in a competitive fashion, but of course anyone is welcome to try! Feel free to comment on anything you (dis)like throughout this primer; hope you will enjoy it!

Honestly, what’s not to love? First off, for just , we get a 3/3 with first strike and deathtouch, which makes her a very adept combatant considering she will insta-kill almost anything foolish enough to block her or anything that’s blocked by her. Even more brilliant, is that whenever an opposing creature dies (which doesn’t have to be caused by anything this deck did), she gets to use its master’s equipment, limbs or other body parts in a ritual that retrieves one of our own artifacts from the grave. This makes her an almost ideal combo-engine.

The following parameters have been used to determine the strength of the deck. For each, a score of 5 (very good), 4 (good), 3 (mediocre), 2 (bad) or 1 (very bad) has been allocated; when totalized this score represents the power rating of the deck.

  • Mana: indicates the availability of mana sources within the deck.
  • Ramp: indicates the speed at which mana sources within the deck can be made available.
  • Card Advantage: indicates availability of filter- and draw resources represented within the deck.
  • Overall speed: indicates the deck’s potential for pace, based on resource availability and mana curve.
  • Combo: indicates the measure of combo-orientation of the deck.
  • Army: indicates the deck’s creature-army strength.
  • Commander: indicates how much the deck is commander-oriented/dependent (less dependency is better).
  • Resilience: indicates the measure in which the deck can prevent and take punches.
  • Spellpower: indicates the availability and strength of high-impact spells.

Mana: 4

What’s fun about this deck’s (additional) mana base, is that it comes from five different sources, four of which are represented numerous times. In all the deck contains two dorks, three rocks, three cards that cheapen the casting of artifacts and five cards that either grant mana upon their death OR grant mana through the sacrificing of others. Lastly, a single treasure generator provides additional energy.

Ramp: 3

Oddly enough for a deck featuring green, very few of its ramp options find their origin in green magic. Actually, most of this potential is brought to the table by artifacts. With Glissa or other artifact-retrieval around, all five of said options can be considered repeatable (which changes to two repeatable options if said retrieval cannot be applied).

Card Advantage: 3

Most of the deck’s draw-options depend on creatures dying or other ways in which cards are transferred to the graveyard; five options in total. Then there’s four tutors, a card that allows draws during our upkeep, a card-filter and a card that allows us to top-deck.

Overall speed: 5

This brew gets off the ground quick. The reasons for this are three-fold: most important cards are colorless (which means we can use any mana to cast them), they’re cheap to cast (the average CMC clocks in at 2.86!) and the deck features plenty of card advantage to retain momentum.

Combo: 5

A major strength of this deck. There are some key cards in here that are used in many (if not most) of the deck’s combos. The opposition will in some cases have to resort to exiling, in order to prevent the deck’s controller from using them. Fear not though, even when opponents manage this, they’ll have a hard time stopping literally all of them as a lot of redundancies have been built in. The deck’s most potent combos result in infinite mana, infinite tokens, infinite damage and complete obliteration of opposing decks’ abilities to maintain armies.

Army: 3

The total creature-base of this deck is actually quite heavy, but very few of its combatants have been added because of their combat-prowess. Most are in here to either fulfill a purpose within one of the deck’s combos OR because of other utilitarian reasons.

Commander: 3

One would be unwise to deny the power Glissa adds to this deck. Being able to return artifacts from our graveyard whenever an opposing creature croaks is no small matter! As mentioned before, she’s also an excellent combatant and by herself a deterrent for attacks in our direction in general. However, the deck contains quite a bit of redundancy in terms of returning stuff (especially artifacts) to our hand, or even the battlefield, so she’s not absolutely essential to our overall strategy.

Interaction: 5

This deck does well when it comes to interaction. Its strongest trait in this regard, is its ability to cause non-combat damage of sorts; sometimes one damage at a time, other times a lot more. The deck contains nine enablers of this kind. Second on this list are its destructive capabilities (five options), while forced sacrifices (three options) comes in at third place and exiling graveyards (two options) at number four. A strong milling enabler and a powerful life-drain card complete the set.

Resilience: 4

Unless our opponents are set on exiling our stuff, we can be reasonably sure that none of this deck’s permanents will definitively break. No fewer than eight cards enable the return of what was (briefly) lost to the graveyard, and most of these options can be used on multiple occasions; some during both our opponents’ turns and our own. Aside from these, the deck also contains a few life-gain options.

Spellpower: 2

Not the deck’s strong suit; it’s very permanent-focused with few enchantments in its arsenal. There are some very powerful X-finishers in here though and a few mass-sacrifice enablers.


Total power score: 37

All in all, this deck is well above average strength considering the metrics used here (with a little tweaking, it could probably be made competitive too, though that would likely impact the fun-factor of playing it in a negative way as a result). Its lack of balance is compensated for by how strong its focus actually is. The combos it enables are strong and also a lot of fun when pulled off successfully.

Wins will generally be pulled off through the application of (infinite) combos. While we wait for the required resources of said combos, we will be adopting a defensive stance. We will summon Glissa, the Traitor *oversized* and a wall of (artifact-)creatures to keep the opposition at bay. Though the deck cannot counter opposing spells, its regenerative abilities ensure that even if the opposition gets some effective ones off, we can recuperate from most negative effects quickly.

At least three cards in the starting hand ought to be lands (or two lands and a cheap-to-cast rock (like Arcane Signet or Sol Ring) or maybe some cheap ramp (like Burgeoning, Expedition Map or Mycosynth Wellspring). It is recommended not to start a game without this hand; even if one has to mulligan down to three cards. The ideal hand would also contain some low-cost draw/filtering options like Ichor Wellspring or Sensei's Divining Top.

The focus of this phase is three-fold; we want to summon Glissa *oversized* to the stage as early as we can manage while we also set up some defenses and resourcing. Nothing starts without the latter, so might as well kick off with these. Aside from the cards mentioned in the starting hand section, some early mana ought to come from resources like Leaden Myr, Mox Opal and especially Metalworker. Additional ramp can come in the form of Sword of the Animist and we can cheapen our artifact costs by deploying Foundry Inspector. If push comes to shove, we can even have some artifact creatures sacrifice themselves for mana like card:Cathodian or Myr Moonvessel.

As soon as we have the mana for her, Glissa *oversized* should make her first appearance; she’ll put a damper on most early attempts at combat aggression. An early anti-combat wall can also be formed by some other chumps and/or utility creatures, like Memnite, Ornithopter and Sylvok Replica (the last of which also is a great deterrent for anyone trying to get cute with us by using hostile enchantments). Lastly, it behooves us to get some punishment/repercussions on the battlefield, for anyone that either tries to get too far ahead of us and/or attempts to get rid of our wall. Cards like Disciple of the Vault, Grim Haruspex, Pitiless Plunderer, Poison-Tip Archer, Scrawling Crawler and Zulaport Cutthroat are all very suitable for this.

The next phase of our plan involves getting ready to combo-off. Most of the deck’s concepts on this front, use a cycle of sacrifice (often in exchange for some sort of reward), recursion and re-summoning. The deck contains cards with abilities that allow for that, so these are next on our casting priority list. Sacrifice outlets can be cards such as Altar of Dementia, Ashnod's Altar, Krark-Clan Ironworks or Phyrexian Altar. Recursion can be either one shot deals (upon death) or more permanent cards. Examples include Junk Diver, Meren of Clan Nel Toth, Nim Deathmantle and Scrap Trawler. Great targets for sacrificing (and resummoning), could be cards that include Hangarback Walker, Marionette Master, Nihil Spellbomb, Spine of Ish Sah and Wurmcoil Engine.

While setting up the above, we can also make sure that whenever something dies (or recurs), we stand to benefit from that OR the opposition stands to experience pain because of it. Some ideas on this front include Aetherflux Reservoir, Altar of the Brood, Dictate of Erebos, Drivnod, Carnage Dominus, Forsaken Monument, Grave Pact, Imotekh the Stormlord and Mirrorworks. Another option is to turn Glissa into an even more powerful combatant than she already is. For this, cards like Tarrian's Soulcleaver and Viridian Longbow come to mind.

Once all the elements of one (or more) of our combos have been gathered, it’s time for the big finale and wipe everything out (sometimes in multiple ways simultaneously). In cases where it takes too long to assemble said combos, we can always try to end it all through the use of Finale of Devastation or Torment of Hailfire.

In constructing this deck, special care has been taken to ensure its controller has a vast arsenal of artifact-related combos at their fingertips. Most of these have been added for a specific purpose, but each has at least one (usually more) additional secondary use. The combos have been arranged by primary purpose.

This combo starts with all mentioned cards on the battlefield and no artifacts in our graveyard.

  1. Sacrifice Trawler to Altar/Ironworks; this triggers Trawler's LTB-ability and Altar/Ironworks.
  2. Trawler's ability fizzles as no artifacts in the GY can be targeted.
  3. Resolve Altar/Ironworks; they generate 2 (mana pool = 2).
  4. Now sacrifice Retriever to Altar/Ironworks, this triggers Retriever and Altar/Ironworks.
  5. Resolve Retriever's ability by returning Trawler back to hand, this triggers Imotekh's ability.
  6. Resolve Imotekh's ability by generating two Necron artifact warriors.
  7. Resolve Altar/Ironworks; they generate 2 (mana pool = 4).
  8. Use 3 to summon Trawler (mana pool = 1).
  9. Sacrifice Trawler and one Necron artifact warrior to Altar/Ironworks, this triggers Trawler and Altar/Ironworks.
  10. Resolve Trawler's ability and return Retriever to hand, this triggers Imotekh again.
  11. Resolve Imotekh's ability by generating two Necron artifact warriors.
  12. Resolve Altar/Ironworks; they generate 4 (mana pool = 5).
  13. Use 2 to summon Retriever (mana pool = 3).
  14. Repeat from step 4.
This combo's primary purpose: infinite Necron warriors. Secondary purposes: infinite colorless mana, infinite ETB/LTB, infinite storm.

This combo starts with all mentioned cards on the battlefield and no artifacts in our graveyard.

  1. Sacrifice Diver/Retriever/Assistant to Altar/Ironworks; this triggers Diver/Retriever/Assistant's LTB-ability and Altar/Ironworks.
  2. Diver/Retriever/Assistant's ability fizzles as no artifacts in the GY can be targeted.
  3. Resolve Altar/Ironworks; they generate 2 (mana pool = 2).
  4. Now sacrifice Diver/Retriever/Assistant (which ever of these you didn't sac yet) to Altar/Ironworks, this triggers Diver/Retriever/Assistant and Altar/Ironworks.
  5. Resolve Diver/Retriever/Assistant's ability by returning the artifact in the GY back to hand, this triggers Imotekh's ability.
  6. Resolve Imotekh's ability by generating two Necron artifact warriors.
  7. Resolve Altar/Ironworks; they generate 2 (mana pool = 4).
  8. Use 2 to summon Retriever (mana pool = 2) OR 3 to summon Diver/Assistant (mana pool = 1).
  9. Sacrifice the Diver/Retriever/Assistant and one Necron artifact warrior to Altar/Ironworks, this triggers Diver/Retriever/Assistant's LTB and Altar/Ironworks.
  10. Resolve Diver/Retrieer/Assistant's ability and return the artifact that was in the GY to hand, this triggers Imotekh again.
  11. Resolve Imotekh's ability by generating two Necron artifact warriors.
  12. Resolve Altar/Ironworks; they generate 4 (mana pool = 5 (or 6)).
  13. Repeat from step 3.
This combo's primary purpose: infinite Necron warriors. Secondary purposes: infinite colorless mana, infinite ETB/LTB, infinite storm.

This combo starts with all mentioned cards on the battlefield, the ability to generate at least 2 mana and with Deathmantle equipped to Imotekh.

  1. Sacrifice Imotekh to Altar/Ironworks, this triggers Altar/Ironworks and Mantle.
  2. Resolve Altar/Ironworks; they generate 2 (mana pool = 4)
  3. Resolve Mantle; pay 4 mana to return Imotekh from the graveyard and attach Mantle to him. This triggers Imotekh's ability.
  4. Resolve Imotekh's ability and generate two Necron warriors
  5. Sacrifice one Necron Warrior and Imotekh to Altar/Ironworks
  6. Repeat from step 2.
This combo's primary purpose: infinite Necron warriors. Secondary purposes: infinite colorless mana, infinite ETB/LTB, infinite storm.

This combo starts with all mentioned cards on the battlefield, the ability to generate at least 2 mana and with Deathmantle equipped to Imotekh.

  1. Sacrifice Engine to Altar/Ironworks, this triggers Wurm, Altar/Ironworks and Mantle.
  2. Resolve Wurm, creating two 3/3 wurms (one with lifelink, one with deathtouch).
  3. Resolve Altar/Ironworks; they generate 2 (mana pool = 4)
  4. Resolve Mantle; pay 4 mana to return Wurm from the graveyard and attach Mantle to it.
  5. Sacrifice Engine and one Wurm to Altar/Ironworks
  6. Repeat from step 2.
This combo's primary purpose: infinite Wurms. Secondary purposes: infinite colorless mana, infinite ETB/LTB, infinite storm.

This combo starts with all mentioned cards on the battlefield, including at least one Myr created when Battlesphere ETB'd.

  1. Sacrifice Engine and one Myr to Altar/Ironworks, this triggers Altar/Ironworks and Mantle.
  2. Resolve Altar/Ironworks, generating 4 mana.
  3. Resolve Mantle; pay 4 mana to return Battlesphere from the graveyard and attach Mantle to it (this generates four Myrs upon ETB).
  4. Repeat from step 1.
This combo's primary purpose: infinite Myrs. Secondary purposes: infinite colorless mana, infinite ETB/LTB, infinite storm.

This combo starts with all artifacts on the battlefield except for Ballista which is in the graveyard.

  1. Activate by sacrificing the non-token non-creature artifact, adding two mana (mana pool = 2).
  2. Scrap Trawler triggers, returning Walker from your graveyard to your hand.
  3. Activate Salvaging Station by tapping it, returning the non-creature artifact from your graveyard to the battlefield.
  4. Cast Walker by paying 0. Walker enters the battlefield and dies as a state-based action due to having zero toughness, Trawler and Salvaging Station trigger.
  5. Resolve the Salvaging Station trigger, untapping itself.
  6. Resolve the Scrap Trawler trigger, returning nothing from your graveyard to your hand.
  7. Repeat.
This combo's primary purpose: infinite creation of Thopters (through paying infinite mana for +1/+1 counters on Walker and then removing them for Thopters). Secondary purposes: infinite +1/+1 counters on Walker, infinite colorless mana, infinite damage, infinite death triggers, infinite ETB, infinite LTB, infinite sacrifice triggers and infinite storm count.

This combo starts with all mentioned cards on the battlefield, including at least one Servo created when Master ETB'd.

  1. Sacrifice Master and one Servo to Altar/Ironworks, this triggers Altar/Ironworks, Master and Mantle.
  2. Resolve Altar/Ironworks, generating 4 mana.
  3. Resolve Master, it deals damage equal to its strength (1) to an opponent.
  4. Resolve Mantle; pay 4 mana to return Master from the graveyard and attach Mantle to it (this generates three servos.
  5. Repeat from step 1.
This combo's primary purpose: infinite damage to opponents. Secondary purposes: infinite colorless mana, infinite ETB/LTB, infinite storm and infinite Servos.

This combo starts with all artifacts on the battlefield except for Ballista which is in the graveyard.

  1. Activate by sacrificing the non-token non-creature artifact, adding two mana (mana pool = 2).
  2. Scrap Trawler triggers, returning Ballista from your graveyard to your hand.
  3. Activate Salvaging Station by tapping it, returning the non-creature artifact from your graveyard to the battlefield.
  4. Cast Walking Ballista by paying 0. Ballista enters the battlefield and dies as a state-based action due to having zero toughness, Trawler and Salvaging Station trigger.
  5. Resolve the Salvaging Station trigger, untapping itself.
  6. Resolve the Scrap Trawler trigger, returning nothing from your graveyard to your hand.
  7. Repeat.
This combo's primary purpose: infinite damage to opponents (through paying infinite mana for +1/+1 counters on Ballista and then removing them for damage). Secondary purposes: infinite +1/+1 counters on Ballista, infinite colorless mana, infinite damage, infinite death triggers, infinite ETB, infinite LTB, infinite sacrifice triggers and infinite storm count.

This combo starts with Ironworks, Spine, Inspector on the battlefield and Steel must be in hand.

  1. Cast Steel by paying 2 (mana pool = 0).
  2. Steel enters the battlefield as a copy of Spine of Ish Sah.
  3. Steel enters the battlefield, destroying target permanent.
  4. Activate Ironworks by sacrificing Steel, adding two mana (mana pool = 2).
  5. Steel triggers, returning to hand.
  6. Repeat.
This combo's primary purpose: Destroy any number of permanents on each of your turns.

This combo starts with all mentioned cards on the battlefield and no artifacts in our graveyard.

  1. Tap Ring to generate 2 (mana pool = 2).
  2. Sacrifice Ring and one of Diver/Retriever/Assistant to Altar/Ironworks, this triggers Trawler and Altar/Ironworks twice.
  3. Resolve the two Trawler triggers, Ring's first (which fizzles because there are no CMC 0 artifacts in the graveyard) and Diver/Retriever/Assistant's second. Choose to not retrieve Ring from the GY.
  4. Resolve Altar/Ironworks, generating 2 x 2 mana (mana pool = 6).
  5. Sacrifice Diver/Retriever/Assistant (the one that's still on the battlefield) to Altar/Ironworks, this triggers Trawler, Diver/Retriever/Assistant and Altar/Ironworks.
  6. Resolve Trawler and choose to return Ring to your hand.
  7. Resolve Diver/Retriever/Assistant, returning Diver/Retriever/Assistant (the one which was already in your graveyard) to your hand.
  8. Resolve Altar/Ironworks, generating 2 (mana pool = 8).
  9. Use 1 to summon Ring (mana pool = 7).
  10. Tap Ring to generate 2 (mana pool = 9).
  11. Sacrifice Ring to Altar/Ironworks, this triggers Trawler and Altar/Ironworks.
  12. Resolve the Trawler trigger (which fizzles because there are no CMC 0 artifacts in the graveyard).
  13. Resolve Altar/Ironworks, generating 2 mana (mana pool = 11).
  14. Use 2 to summon Retriever (if you just returned that to hand in step; mana pool = 9) OR use 3 to summon Diver/Assistant (if you just returned that to hand; mana pool = 8).
  15. Repeat from step 5.
This combo's primary purpose: infinite colorless mana. Secondary purposes: infinite ETB/LTB and infinite storm.

This combo starts with Drivnod, Retriever, Ironworks and a non-token artifact with mana value <= 1 on the battlefield, while Trawler/Diver/Assistant must be in the graveyard.

  1. Activate Krark-Clan Ironworks twice by sacrificing the non-token artifact with mana value one or less and Myr Retriever, adding four mana (mana pool = 4).
  2. When Myr Retriever dies, its ability triggers twice, returning Junk Diver and the non-token artifact with mana one or less to your hand from your graveyard.
  3. Cast Junk Diver and the non-token artifact by paying at most 4.
  4. Activate Krark-Clan Ironworks twice by sacrificing the non-token artifact and Junk Diver, adding four mana (mana pool = 4).
  5. When Junk Diver dies, it triggers twice, returning the non-token artifact and Myr Retriever to your hand from your graveyard.
  6. Cast the non-token artifact and Myr Retriever by paying at most 3.
  7. Repeat.
This combo's primary purpose: infinite colorless mana. Secondary purposes: infinite death triggers, infinite ETB, infinite LTB, infinite sacrifice triggers and infinite storm count.

This combo starts with Cathodion and Altar/Ironworks on the battlefield, with Deathmantle equipped to Cathodion.

  1. Sacrifice Cathodion to Altar/Ironworks, this triggers Cathodion, Altar's/Ironwork's and Deathmantle's abilities.
  2. Resolve Cathodion, its death results in three mana (mana pool = 3).
  3. Altar/Ironworks resolves, it generates two mana (mana pool = 5).
  4. Resolve Deathmantle, pay four mana to return Cathodion to the battlefield with Deathmantle attached to it (mana pool = 1).
This combo's primary purpose: infinite colorless mana. Secondary purposes: infinite death triggers, infinite ETB, infinite LTB and infinite sacrifice triggers.

This combo starts with all artifacts on the battlefield.

  1. Sacrifice Moonvessel to Altar/Ironworks, adding two mana (mana pool = 2).
  2. Myr Moonvessel and Dictate of Erebos trigger.
  3. Resolve Myr Moonvessel's trigger, adding one mana.
  4. Resolve Dictate's/Pact's trigger, causing each opponent to sacrifice a creature.
  5. Glissa triggers at least once, return Moonvessel to hand.
  6. Cast Myr Moonvessel by paying 1.
  7. Repeat until opponents no longer control any creatures.
This combo's primary purpose: infinite colorless/colored mana. Secondary purposes: near-infinite death triggers, near-infinite ETB, near-infinite LTB, near-infinite sacrifice triggers, near-infinite storm count and opponents sacrifice all their creatures every turn.

This combo starts with Glissa, Butcher/Dictate/Pact, Altar/Ironworks and Cathodion/Memnite/Ornithopter on the battlefield.

  1. Sacrifice Cathodion/Memnite/Ornithopter to Altar/Ironworks, adding one or two mana, this also triggers Cathodion to generate three mana.
  2. Dictate/Pact triggers, causing each opponent to sacrifice a creature.
  3. Glissa triggers at least once, which allows one to return Cathodion/Memnite/Ornithopter to hand.
  4. Cast Cathdian/Memnite/Ornithopter by paying 0 in case of Memnite/Ornithopter or 3 in case of Cathodion.
  5. Repeat until opponents no longer control any creatures.
This combo's primary purpose: infinite colorless/colored mana. Secondary purposes: near-infinite death triggers, near-infinite ETB, near-infinite LTB, near-infinite sacrifice triggers, near-infinite storm count and opponents sacrifice all their creatures every turn.

This combo starts with all artifacts on the battlefield, Steel is a copy of Ironworks.

  1. Sacrifice Steel to Ironworks, this triggers Trawler and Ironworks
  2. Resolve Trawler and return Steel to your hand.
  3. Resolve Ironworks, generating 2 mana (mana pool = 2)
  4. Summon Steel for 2 (because of Inspector) and copy Ironworks.
  5. Repeat from step 1.
This combo's primary purpose: infinite ETB/LTB. Secondary purposes: infinite storm.

This combo starts with Retriever in hand, with Mirrorworks and Altar/Ironworks on the battlefield.

  1. Cast Myr Retriever by paying 2 (mana pool = 0).
  2. Retriever enters the battlefield, triggering Mirrorworks.
  3. Holding priority, activate Ironworks by sacrificing Retriever, adding two mana (mana pool = 2).
  4. Retriever dies, returning another artifact card from your graveyard to your hand.
  5. Resolve the Mirrorworks trigger from step 2 (mana pool = 0), creating a token copy of Retriever.
  6. Activate Ironworks by sacrificing the token Retriever, adding two mana (mana pool = 2).
  7. The token Myr Retriever dies, returning Retriever from the graveyard to hand.
  8. Repeat.
This combo's primary purpose: infinite ETB/LTB. Secondary purposes: yields infinite death triggers, infinite sacrifice triggers and infinite storm.

This combo starts with all artifacts on the battlefield.

  1. Activate Top by tapping it, drawing a card and then putting Top on top of your library.
  2. Cast Top from the top of your library by paying 0.
  3. Repeat.
This combo's primary purpose: infinite card draw. Secondary purposes: near infinite storm.

This combo starts with Glissa, Dictate/Pact, Altar and Cathodion/Memnite/Ornithopter on the battlefield.

  1. Sacrifice Cathodion/Memnite/Ornithopter to Altar, which mills an amount of cards equal to the creature's power (which is 0 for Ornithopter), this also triggers Cathodion to generate three mana (mana pool = 3).
  2. Dictate/Pact triggers, causing each opponent to sacrifice a creature.
  3. Glissa triggers at least once, which allows one to return Cathodion/Memnite/Ornithopter to hand.
  4. Cast Cathodion/Memnite/Ornithopter by paying 0 in case of Memnite/Ornithopter (mana pool = 0 or 3) or 3 in case of Cathodion (mana pool = 0).
  5. Repeat until opponents no longer control any creatures.
This combo's primary purpose: forced sacrifice of all opposing creatures. Secondary purposes: near-infinite mill, near-infinite death triggers, near-infinite ETB, near-infinite LTB, near-infinite sacrifice triggers and near-infinite storm count.

Reliable sources of mana, and some utility:

The cards used to accelerate mana-availability:

  • Arcane Signet: best commander-coloured mana-rock in MTG; period.
  • Ashnod's Altar: vast amounts of colourless mana can be generated with this slab.
  • Burgeoning: in most EDH-groups, this brings vast ramping potential, and an almost unsurmountable advantage if cast on turn 1.
  • Cathodion/Myr Moonvessel: when these go to the beyond, the energy that leaves their bodies can be re-used for whatever purpose you need it for.
  • Commander's Sphere: not just a provider of coloured mana, but a draw-resource as well when sacrificed.
  • Leaden Myr: excellent little artifact dork.
  • Expedition Map: sacrifice to tutor any land from the library.
  • Foundry Inspector: less mana required for artifacts; always a good thing.
  • Krark-Clan Ironworks: artifacts, not just creatures, can be put on the energy-drain slab too.
  • Metalworker: possibly the strongest mana-dork amongst artifacts.
  • Mox Opal: in an artifact-rich deck, this is hands down the best multi-colour mana rock.
  • Mycosynth Wellspring: a ramping artifact that works at least twice.
  • Phyrexian Altar: get a creature one the block, kill it and harvest the energy!
  • Pitiless Plunderer: open that grave and dig up them treasures!
  • Sol Ring: are there EDH decks without this card?
  • Solemn Simulacrum: ramp when it ETB’s, draw when it LTB’s.
  • Sword of the Animist: equip this to a difficult to block/kill creature and benefit from ramp whenever it attacks.
  • Ugin, the Ineffable: saves quite a lot of energy at casting most of the deck’s cards.

The mechanisms that provide card advantage:

  • Demonic Tutor: the most recognizable tutor in all of MTG and much loved for its low casting cost, its simplicity and its multi-functionality.
  • Fauna Shaman: makes it easier to find the right creatures for combos.
  • Finale of Devastation: excellent tutor and potentially a huge finisher of games!
  • Grim Haruspex: lots of non-token creatures on our side will die; time to benefit!
  • Ichor Wellspring: can be used for draw twice!
  • Mystic Forge: allows for top-decking of artifacts.
  • Scrawling Crawler: everybody draws, but only we will get away with that unscathed.
  • Sensei's Divining Top: one of the best filter and draw artifacts in MTG.
  • Vampiric Tutor: any card that’s required in exchange for some life? Deal!

The graveyard, … it’s just a transition:

  • Junk Diver: it heads straight down to your garbage and picks up your broken trinket.
  • Meren of Clan Nel Toth: she yanked it straight back from its afterlife into reality.
  • Myr Retriever: cheapest, multi-functional retrieval enabler in the deck.
  • Nim Deathmantle: for just 4 mana, it transforms a creature into a powerful zombie that becomes nigh unkillable.
  • Salvaging Station: retrieves really cheap artifacts easily.
  • Scrap Trawler: the more expensive the artifact just died was, the more expensive artifact we can retrieve from our graveyard.
  • Workshop Assistant: not very creative, but anything it has built before it can build again!

  • Altar of Dementia/Altar of the Brood: very powerful slabs that actually influence the availability of opposing spell arsenals.
  • Assassin's Trophy: any permanent we feel like eighty-sixing, we can get rid of. Its controller has an issue with that? That’s too bad … have a land.
  • Dictate of Erebos/Grave Pact: the banshees and the gods are calling your creatures straight into their final resting place.
  • Disciple of the Vault: with our combos focussed so much on trashing our artifacts, might as well cause some pain while doing that.
  • Marionette Master: lots of drain potential, and some token-generation on the side.
  • Nihil Spellbomb: your graveyard is nice and full? Great, exile it.
  • Poison-Tip Archer: this deals damage whenever a creature (token or otherwise) dies, to every opponent.
  • Spine of Ish Sah: a reusable destroyer that doesn’t even need another resurrection mechanism, because it has its own.
  • Sylvok Replica: getting rid of many opposing artifacts and enchantments is always tricky, until you gain control over something like this guy along with recursion mechanisms.
  • The Meathook Massacre: acts as a wipe upon ETB, and then proceeds to drain everyone when applied to one of the deck’s infinite combos.
  • Torment of Hailfire: one of the most deadly X-spells brought out in recent years; excellent for (infinite-)mana sinks.
  • Viridian Longbow: equipped to Glissa *oversized* or Poison-Tip Archer, this is an insta-kill combination of any non-indestructible creature.
  • Walking Ballista: excellent infinite mana sink and a great dealer of damage in any environment.
  • Zulaport Cutthroat: the perfect drain engine in a deck featuring this many ETB/LTB combos.

All the wonderful cards we couldn’t fit in any of the above categories

  • Aetherflux Reservoir: massive opportunity for gaining life and dealing pretty lethal damage.
  • Drivnod, Carnage Dominus: with a deck that enables this much death and destruction as the means to gain benefits, this card is key in doubling said benefits.
  • Forsaken Monument: allows for more mana generation, strengthens our colourless creatures and allows for some excellent life-gain when casting colourless spells.
  • Hangarback Walker: dying equals birth in the case of this wonderful engine.
  • Imotekh the Stormlord: Necrons are resurrected artifacts, so considering that Imothek’s ability makes a lot of sense.
  • Liberator, Urza's Battlethopter: casting artifacts at instant-speed can be a great boon and might even enable combos during opponents’ turns.
  • Mirrorworks/Sculpting Steel: copying artifacts can be great fun; especially when it can be repeated.
  • Silent Arbiter: in a deck that wins mostly through combos, attacking and defending isn’t necessary, so having this guy in makes sense for defensive purposes.
  • Tarrian's Soulcleaver: the equipment that enhances its recipient’s strength very, very fast when this deck is allowed to operate.

Appreciate the time you took to read this primer. Hopefully it was entertaining and useful to you. If so, feel free to leave a +1 and/or feedback of any kind in the comments below. Thanks again!

Suggestions

Updates Add

Comments

Casual

95% Competitive

Revision 1 See all

(1 week ago)

-1 Copper Myr main
+1 Fauna Shaman main